I spent $55 a month on Adobe Premiere Pro for two years before I realized I was paying for features I never touched. Every tutorial I watched used the same 5% of tools. Every video I made could've been edited in something free.
So I tested the free alternatives properly. Not the ones that watermark your exports or crash every 10 minutes. The ones that actually let you make videos that don't look amateurish. This is what I found.
Why Free Doesn't Mean Worse
Before I get into the specifics, let me be clear: free video editors have a legitimacy problem that isn't really about the software.
A lot of people assume free = limited = bad. That's partly true if you're comparing directly to Premiere Pro's professional color grading suite. But here's the thing — most content creators, students making project videos, and professionals shooting YouTube content don't need color grading that matches a Netflix production. They need to cut clips, add transitions, sync audio, and export without a watermark.
Free tools now handle all of that. I've edited videos on DaVinci Resolve that I've shown to clients. No embarrassment. No asterisk.
The real limitation of free software isn't the features. It's your own patience. These tools have learning curves. Adobe trained you to expect a certain workflow. Free software does the same things differently, and that's where people quit.
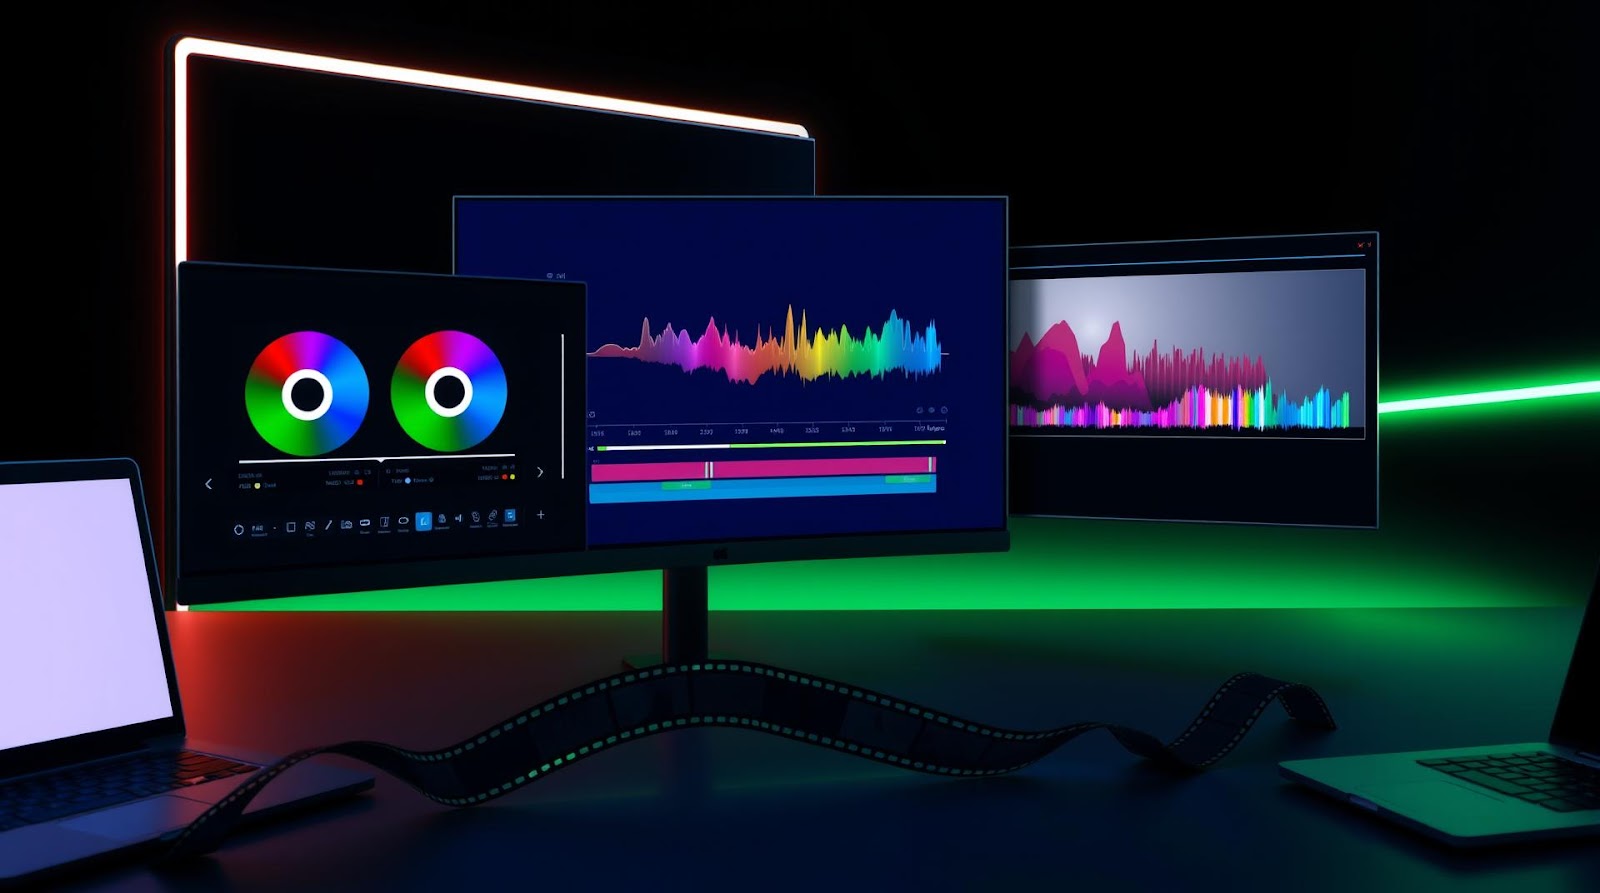
DaVinci Resolve — The Actual Professional Option
DaVinci Resolve is the one free video editor that makes you question why you'd ever pay for anything else. And I mean that without hyperbole.
It's built by Blackmagic Design, a company that makes cameras and color grading hardware for actual film studios. They release this software for free because they want to sell you expensive hardware later. The result is that the free version has tools professionals pay thousands for in other software.
Getting Started: The First 20 Minutes
Download from blackmagicdesign.com. Not from some sketchy third-party site. The official version is free. Installation takes 5 minutes.
When you open it, you'll see this dark interface with way too many buttons. This is where most people close it and go back to iMovie.
Don't. Do this instead:
Step 1: Create a new project. Name it "Test" or whatever. Click "Create".
Step 2: In the top menu, you'll see "Media," "Cut," "Edit," "Fusion," "Color," and "Deliver." Ignore everything except "Edit" for now. Click it.
Step 3: On the left, there's a folder icon that says "Media Pool." Click it, then drag video files into that panel. You can also just import them through File > Import.
Step 4: Drag your video clips into the timeline (the long horizontal bar at the bottom). You can now cut, trim, and arrange shots exactly like you would in any other editor.
That's genuinely it. Everything else is bonus.
What Makes It Actually Good
The cut detection is scary good. DaVinci can auto-detect scene changes in your footage. For someone editing a documentary or a long interview, this alone saves hours.
Transitions are smooth and don't look cheap. The default crossfade isn't a 2-second fade that screams "beginner." You get legitimate dissolves, zoom transitions, and wipes that feel intentional.
Audio syncing is built in. If you recorded video on your camera and audio on a separate recorder (common for YouTube creators), DaVinci will sync them automatically based on waveforms. No more manual alignment.
And then there's the color page. In Premiere Pro, color grading requires $20/month extra or third-party plugins. In DaVinci, it's free and actually powerful. You can shift skin tones, adjust white balance, and make your footage look professional without knowing much about color theory.
Shotcut — The Lightweight Alternative
DaVinci is powerful but it's heavy. It takes 8 seconds to open on my laptop. For quick edits, TikToks, or Instagram Reels, that's annoying.
Shotcut is the opposite. It launches instantly. It's open-source, which means programmers worldwide contribute to it and there are no corporate limitations.
The interface is cleaner than DaVinci, though less polished. It doesn't have the color grading tools, but honestly, for a 30-second social media video, you don't need them.
When Shotcut Wins
If you're editing lots of footage in different formats (vertical TikTok clips, square Instagram clips, 16:9 YouTube clips), Shotcut handles format conversion better. You don't have to transcode everything to a single format first.
Speed ramping — the effect where video plays at 2x, then 0.5x, then normal speed — is simpler in Shotcut than DaVinci. I could be wrong here, but it's just fewer clicks.
It runs on basically anything. I've edited videos on a 6-year-old laptop using Shotcut. Try that with DaVinci and you'll get an error message.
Download it from shotcut.org. The workflow is similar to DaVinci: import media, drag to timeline, cut and arrange, then export. Nothing mysterious.
CapCut — The Underrated Option
CapCut started as a mobile app and got a desktop version a few years ago. Most tech reviewers ignore it because it's "just for TikTok." That's wrong.
I used it to edit a 15-minute YouTube video last month. No paid version, no watermarks, no crashes. It exported in 8 minutes on my mid-range laptop.
CapCut's strength is simplicity. The timeline is intuitive. Text captions are ridiculously easy — you can auto-generate them and it's actually accurate. Transitions are already built-in and look modern because CapCut is designed by people who understand what actually looks good on social media.
The downside: it's owned by ByteDance (TikTok's parent company), so there are privacy questions depending on where you live. In India and the EU, that might matter to you. It also feels slightly less "professional" than DaVinci, even though the output quality is identical.
For students making class projects or creators focused on YouTube and Instagram, CapCut is faster. Genuinely.
The Comparison: Which One to Actually Use
| Software | Best For | Learning Curve | Performance | Export Speed |
|---|---|---|---|---|
| DaVinci Resolve | Long-form videos, color grading, professional look | Moderate | Heavy (requires good hardware) | Slow on weak systems |
| Shotcut | Mixed formats, older computers, quick edits | Easy | Lightweight | Fast |
| CapCut | Social media, quick turnaround, text captions | Very Easy | Very Lightweight | Very Fast |
My Take
Here's what surprised me: DaVinci Resolve should be the industry standard, not the "free alternative." Blackmagic is essentially sponsoring the entire creative industry by giving away software that costs competitors thousands.
What disappointed me was how most beginners pick the wrong tool for their situation. I see students using DaVinci to edit 60-second videos when CapCut would have the same output in 1/10th the time. Conversely, people making YouTube essays pick CapCut when DaVinci's auto-cut detection would save them 4 hours.
My honest take: if you have 8GB RAM or more, start with DaVinci. Learn it properly. You'll never pay for video editing software. If your computer is older or you edit short social media content, CapCut is the answer. Shotcut sits in a weird middle ground — powerful enough for anything, but slightly awkward. It's my third choice.
And stop letting YouTube creators tell you that free software "limits your creativity." It doesn't. Your creativity is limited by your skill, not by whether you paid for the software.
Verdict
Download DaVinci Resolve if: You want professional output and don't mind learning the software. YouTube, documentaries, anything longer than 3 minutes.
Download CapCut if: You need speed. TikTok, Instagram, YouTube Shorts, class projects due tomorrow.
Download Shotcut if: Your computer is 5+ years old or you work with weird file formats.
All three are genuinely free, have no watermarks, and produce exports that look as good as paid software. The difference isn't in quality. It's in which one fits your workflow. Pick one and stick with it for a month. You'll be faster than you ever were with paid software because you'll actually use all the features.
Published by Dattatray Dagale • 13 June 2026


0 Comments